Author Topic: Making a Panorama Head with a Difference.  (Read 22115 times)

Seapy

  • NG Member
  • *
  • Posts: 830
Re: Making a Panorama Head with a Difference.
« Reply #90 on: February 05, 2018, 23:07:09 »
Congratulations, really impressive work!
You now have an excellent  candidate to display in the "Users Showcase" section of the FreeCad forum, there is for instance a continuing thread "From FreeCAD To The Real World"  :) .

Thank you Øivind, I will look at that, I was very impressed with FreeCAD, I will definitely use it again for future projects.
Robert C. P.
South Cumbria, UK

Seapy

  • NG Member
  • *
  • Posts: 830
Re: Making a Panorama Head with a Difference.
« Reply #91 on: February 05, 2018, 23:23:37 »
Thank you all for your appreciation, it's taken me a while, with a few distractions along the way.  I am very pleased with the result so far.  I have to decide how to make the 'click stop' mechanism for the rotation, I have some ideas and will work on that next.  It needs to be positive and solid but not disturb the tripod settings when turning to the next position.

It has forced to get my own lathe working, I had a very comprehensive engineering toolkit 15 years ago but when I had to give my lathe up because I had nowhere to house it, I gradually dispersed my tooling which had taken years to acquire.  I have very few Morse taper drills and reamers etc, I had boxes of them at one time.  I never expected I would ever need them again.

I am looking forward to using the pano head, we have subjects galore around here. Some lovely churches, castles and of course the lakes, gardens and woods.

It's a long way from my original design which was like the Manfrotto head, but I wanted to use the principle of the nodal point at the centre of the movement rather than the outside as is the case with the Manfrotto swing arm type.
Robert C. P.
South Cumbria, UK

richardHaw

  • Cute Panda from the East...
  • NG Member
  • *
  • Posts: 3184
  • Your lens loverboy
    • Classic Nikkor Maintenance and DIY
Re: Making a Panorama Head with a Difference.
« Reply #92 on: February 06, 2018, 02:47:50 »
how about the usual bearing ball and spring mechanism found on most lenses  :o :o :o

a flimsy leaf spring with opposing slots will be too flimsy for this ::)

Seapy

  • NG Member
  • *
  • Posts: 830
Re: Making a Panorama Head with a Difference.
« Reply #93 on: February 06, 2018, 15:04:50 »
how about the usual bearing ball and spring mechanism found on most lenses  :o :o :o

a flimsy leaf spring with opposing slots will be too flimsy for this ::)

Yes, that's my thoughts too, I have some detents taken from a laser printer but I think they will be too flimsy.

I am thinking 8mm ball and a spring behind it.  I have a little bronze, am thinking of making a sleeve which would screw into the underside of the swivel arm which would contain the ball and spring.  I have a stainless ring which I propose to screw to the top of the base and make some (six) indents with a drill point at regular intervals.  That keeps it neat and mostly hidden under the arm.  The resistance of the detent is important, it has to be sufficient to stop the camera being blown round in strong winds such as you find at the tops of mountains, but not so strong that it disturbs the tripod when turned. Maybe I will have to make it variable with a screw knob above?  Will try fixed for a start.

The angle of cut, depth and size of the indents in the ring will also influence the resistance. 
Robert C. P.
South Cumbria, UK

CS

  • NG Member
  • *
  • Posts: 1240
  • You ARE NikonGear
Re: Making a Panorama Head with a Difference.
« Reply #94 on: February 06, 2018, 15:54:28 »
A fine piece of work!  8)
Carl

Seapy

  • NG Member
  • *
  • Posts: 830
Re: Making a Panorama Head with a Difference.
« Reply #95 on: February 08, 2018, 10:56:25 »
Thank you Carl!

Final stage, the Indexing Plate.

Yesterday, having diverted my energies to other things, I am trying to overcome my D3 battery issue.  While waiting for eBay to deliver the bits I feel could provide the solution, I thought I better get on and do the final machining stage of the pano head, the indexing plate.

I made the ball retaining sleeve from a little scrap brass, a quarter inch ball bearing and a spring.  It was very tricky to drill a tight hole for the ball, yet reduce the diameter to prevent the ball escaping AND have sufficient ball protruding, to engage as fully as possible with the indexing plate.

I was in some trepidation about it, it's a tiny part of the project but a crucial one.  I rang my friend and discussed the options, either on his milling machine or my lathe... In the end we decided it would be better to use an indexing head on his milling machine, so I went over to his place.  I was too focused on the task to remember to photograph the actual milling but I do have a photo of the setup, taken afterwards.
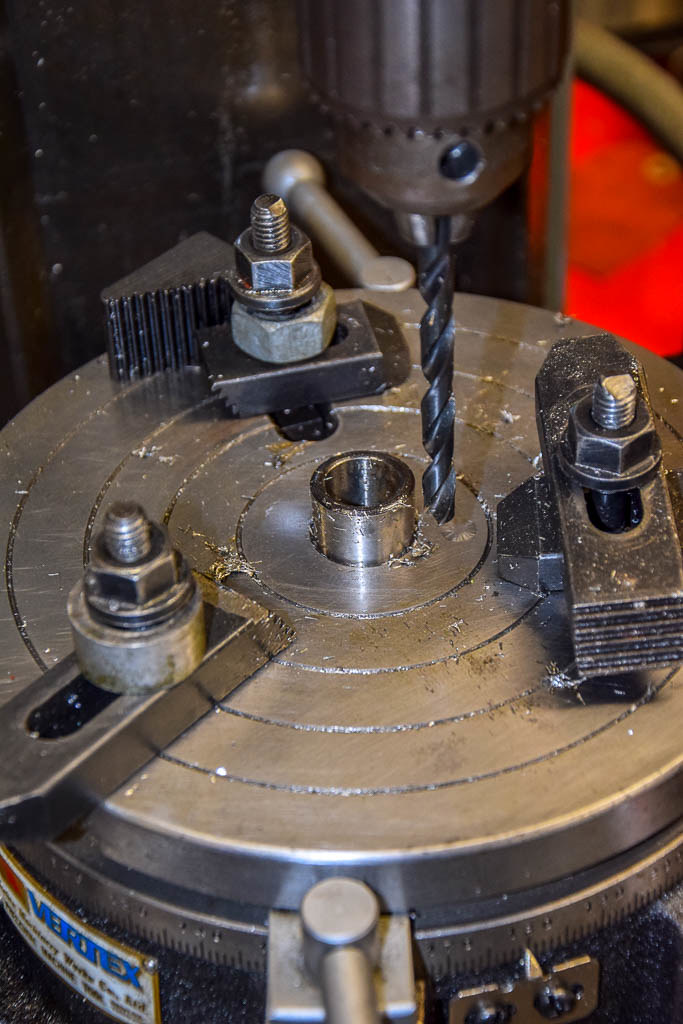


The setup was easy, easier than I expected, but the mill doesn't have a quill, the only way of driving the drill into the metal is by raising the table.  The table is very heavy (it takes two hands to wind it) and somewhat awkward to raise accurately.  I set the depth gauge so the first cut could be repeated but all the cuts are slightly different depths.   :(  With the relatively flat angle of the drill V, slight differences in depth are magnified in the angle of the cut, the errors are doubled because the slack is diameter, not radius, back and forward.

The result is that three of the locations are positive, click in, nice and tight, no movement.  The  other three are loose, one very loose.  >:(  The ones with the black dots are the loose ones.
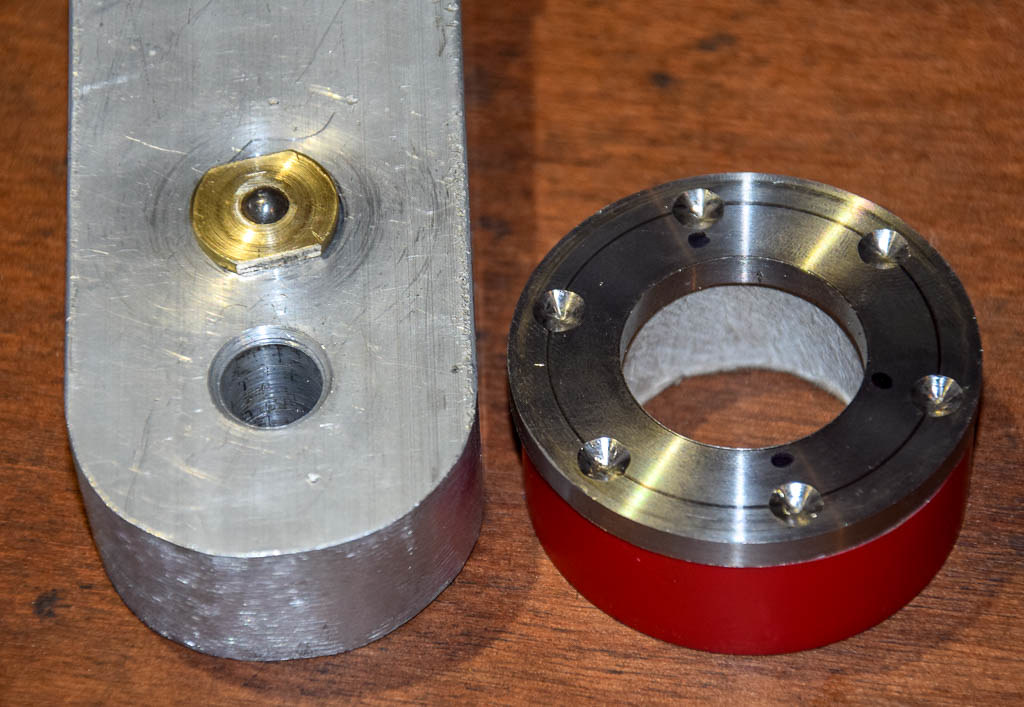


Somewhat disappointed, on my way home I was trying to think of a solution, since accurate, positive location is crucial to the entire thing.  This morning playing around with it and considering the alternatives, I  have finally decided to drill the holes right through, at a smaller size, that way I retain the accurate indexing of 60º and the pitch circle radius of the holes, which I think is spot on.  I will use a slightly smaller drill than may be indicated, which gives me the option to enlarge the holes if needs be, it's not easy to make them smaller...  ;D

Just waiting for it to get a little less cold outside, is raining too, a proper gloomy February day, roll on spring and summer!   ;D

Robert C. P.
South Cumbria, UK

Seapy

  • NG Member
  • *
  • Posts: 830
Re: Making a Panorama Head with a Difference.
« Reply #96 on: February 08, 2018, 12:43:05 »
OK, happy now!   ;D

I drilled the holes right through with a bit that was slightly smaller than what I thought was ideal.  Result, snappy indexing, at the end of the arm, it requires between 1,100 grams and 1,700 grams to move the head out of the detent.  None of the detents are 'loose' and they all grip nicely, nice easy fix.


I did relieve the edges of the holes very slightly, you can see the track where the detent ball slides around the 316 grade stainless steel ring.  It's relatively easy now to make other rings with other indexing for narrower lenses or DX format.

Just remains to burnish all the scuffs and scrapes off and send it for anodising next week.  I need to think of some way to calibrate the curved rail in degrees above and below horizontal.  The indexing table seems the obvious answer.
Robert C. P.
South Cumbria, UK

Erik Lund

  • Global Moderator
  • **
  • Posts: 6529
  • Copenhagen
    • ErikLund.com
Re: Making a Panorama Head with a Difference.
« Reply #97 on: February 08, 2018, 12:51:02 »
Looks much better now for sure :)
Erik Lund